Overproofed sourdough? Don’t panic. A common dilemma, but fret not, solutions are at hand. The telltale signs: a flat loaf, dense texture, or lackluster rise. Salvage your batch with a few simple adjustments. Eager to rescue your overproofed sourdough? Let’s delve into the reasons behind this hiccup and find the remedy. Let’s revive that delicious, tangy sourdough goodness together.

Understanding Overproofed Sourdough: What Happens When You Let Your Dough Rise Too Long
Welcome, bread enthusiasts! Today, we’re delving into the world of sourdough baking and tackling a common issue that many bakers face – overproofed sourdough. If you’ve ever ended up with a flat, dense loaf that didn’t quite rise as expected, chances are your dough may have been overproofed. But fear not, we’re here to unravel the mystery behind overproofing and guide you on how to avoid this pitfall in your sourdough baking adventures.
The Science Behind Sourdough Fermentation
Before we dive into the specifics of overproofing, let’s take a moment to appreciate the fascinating science behind sourdough fermentation. Sourdough bread is unique in that it relies on wild yeast and beneficial bacteria to rise, unlike commercial yeast bread that uses specific strains of yeast. When you mix flour and water to create sourdough starter, you’re creating an environment where wild yeast and lactobacilli bacteria thrive, leading to a fermentation process that gives sourdough its characteristic flavor and texture.
During fermentation, the wild yeast in the sourdough starter consumes the sugars in the flour and produces carbon dioxide gas and alcohol as byproducts. This gas is what creates the airy structure of bread, causing it to rise. However, the delicate balance of fermentation can easily tip over if the dough is left to proof for too long.
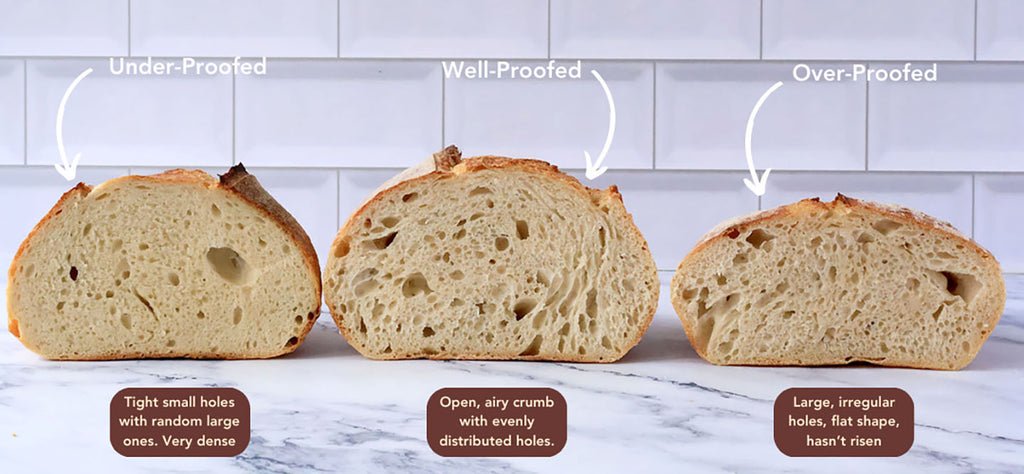
Signs of Overproofed Sourdough
So, how do you know if your sourdough has been overproofed? There are several telltale signs to look out for:
1. Excessive Flatness
One of the most obvious indicators of overproofing is a flat and deflated dough. Instead of a nicely risen loaf with a rounded top, an overproofed sourdough will spread out and lack the desired height and structure.
2. Loss of Gluten Strength
Over time, the gluten structure in the dough weakens due to prolonged fermentation, leading to a lack of support for the gas produced during proofing. This results in a collapsed and dense final product.
3. Sticky and Slack Texture
An overproofed dough may become overly sticky and slack, making it challenging to shape and handle. The gluten breakdown during extended fermentation contributes to this undesirable texture.
4. Sour and Alcoholic Smell
While a slightly tangy aroma is expected in sourdough bread, an overpowering sour or alcoholic smell can indicate that the dough has fermented for too long, producing excessive acids and alcohols.
Factors Contributing to Overproofing
Several factors can contribute to overproofing, and understanding these variables can help you prevent it in your sourdough baking process:
1. Temperature
Temperature plays a crucial role in fermentation, with warmer environments accelerating the activity of yeast and bacteria. If your dough is proofed in a warm spot, it may ferment more quickly, increasing the risk of overproofing.
2. Sourdough Starter Strength
The vigor of your sourdough starter can impact the fermentation process. An overly mature or active starter can cause the dough to ferment too rapidly, leading to overproofing if not monitored carefully.
3. Proofing Time
Monitoring the proofing time is essential in sourdough baking. Allowing the dough to proof for too long, especially during the final rise, can push it past the optimal fermentation point and result in overproofed bread.
4. Flour Type
The type of flour you use can also influence proofing times. Different flours absorb water differently and affect the fermentation rate. Whole wheat flour, for example, ferments faster than white flour due to its higher nutrient content.
Preventing Overproofed Sourdough
Now that you’re equipped with the knowledge of what causes overproofing, let’s explore some strategies to prevent this common baking mishap:
1. Use the Float Test
The float test is a simple yet effective way to gauge the readiness of your dough for baking. Simply drop a small piece of dough into a glass of water – if it floats, your dough is ready. If it sinks, it needs more time to proof.
2. Adjust Proofing Time
Keep a close eye on your dough during the proofing process and adjust the timing based on ambient temperature and the activity of your sourdough starter. A slower, cooler proof can help prevent overproofing.
3. Refrigerate the Dough
If you need to delay baking, consider refrigerating the dough during the final proof. The cold temperature slows down fermentation, giving you more control over the process and reducing the risk of overproofing.
4. Experiment with Different Flours
Depending on your preferences and baking goals, experimenting with different flours can offer unique flavors and textures in your sourdough bread. Whole grain flours tend to ferment faster, so adjusting the ratio of whole wheat to white flour can help control proofing times.
Reviving Overproofed Dough
Oops, it happens to the best of us – you’ve realized your dough has been overproofed. But don’t fret, there are ways to salvage the situation and still bake a delicious loaf:
1. Retardation
If your dough shows signs of overproofing, you can try retarding it in the fridge for a few hours to slow down fermentation and firm up the dough. This can help strengthen the gluten structure before shaping and baking.
2. Reshape and Rest
Gently reshape the overproofed dough, tucking the edges under to create tension, and let it rest for a shorter period before baking. This can help reinvigorate the gluten and provide some lift to the final loaf.
3. Bake in a Dutch Oven
Baking your overproofed dough in a preheated Dutch oven can help contain the spread of the loaf and encourage a better rise. The steam created within the pot mimics a professional oven, resulting in a crusty and well-risen bread.
There you have it, budding bakers – a comprehensive guide to understanding and addressing the challenges of overproofed sourdough. Armed with knowledge about the fermentation process, signs of overproofing, preventative measures, and potential solutions, you’re well-equipped to navigate the world of sourdough baking with confidence and finesse. Remember, practice makes perfect, and don’t be discouraged by a few flat loaves along the way. Happy baking!
OVER FERMENTED SOURDOUGH – The Signs and Consequences
Frequently Asked Questions
What are the signs of an overproofed sourdough?
Overproofed sourdough can exhibit signs such as a very bubbly and fragile texture, loss of structure, a collapsed appearance, and a sour or alcohol-like smell. The dough may also have a sticky or overly wet consistency.
How can I prevent my sourdough from overproofing?
To prevent overproofing, it’s important to closely monitor the fermentation process by checking the dough periodically for its rise and texture. Adjusting the room temperature or the amount of sourdough starter used can also help control the proofing process.
Can you still bake with an overproofed sourdough?
If your sourdough is slightly overproofed, you may still be able to salvage it by reshaping the dough and allowing it to proof for a shorter period of time before baking. However, if it is severely overproofed, it may not yield the desired results and might be best used for other recipes.
Final Thoughts
Overproofed sourdough can result in a dense and flat loaf with a bland taste. It is crucial to carefully monitor the sourdough’s fermentation process to achieve the best results. To avoid overproofing, pay close attention to the dough’s rise and texture. By understanding the signs of overproofed sourdough, you can ensure a delicious, well-textured loaf every time.